Sunday, April 28, 2013

Peruvian Wave Bracelet Tutorial

This bracelet is awesome and really fun to make. I hope this tutorial will explain to you how to make one yourself.

Supplies
Eight strings (four colors, two of each color) Two of these strings you won't see when you make this bracelet. I'm using green, pink, blue, and white. (You won't see the white strings.)

Step 1
Cut your strings and start it the way you want (braids, buckle, etc.)

Step 2
Set up you strings so that the colors are together. Mine are set up pink, pink, blue, blue, green, green, white, white. Always make sure that the color you don't see is always the outermost string. I'll refer to the strings as P1 P2 B1 B2 G1 G2 W1 W2


Step 3
Take G2 and make forward knots onto W1 and W2.


Step 4
Now take G1 and make forward knots onto W1 and W2

Step 5
Continue making forward knots onto the white strings with the other colors until your setup is opposite of what it was at the beginning.
W1 W2 P1 P2 B1 B2 G1 G2


Step 6
Take P1 and make backward knot onto W2 and W1


Step 7
Take P2 and make backward knots onto W2 and W1

Step 8
Continue making backward knots onto the white strings with the other colors until you setup returns to the same setup as step 2.


Step 9
Continue steps 1-8 until your bracelet is the desired length. End your bracelet the way you want and enjoy your bracelet!


Monday, April 15, 2013

Ways to start and end a bracelet

There are many ways to start and end a friendship bracelet, so I am going to give you a list of some of them.

Knot and loose strings
This is the easiest way to start and end a friendship bracelet. Just tie an overhand knot at the beginning, leaving enough string at the top to tie with, make the bracelet and tie another knot at the end.

Braided ends 
This is another easy way to start and end your bracelet. You can do it just like previous way and braid the loose strings or do it like this…
Tape your string to a surface, leaving enough string to braid with. Then make your bracelet until it is the right length for you. Don't tie an overhand knot at the end, just take the strings at the end and braid them. Then take the strings that are at the top and braid them the same way you did for the bottom one. I like braiding it the second way with alpha patterns because it doesn't make the edges curl.

Buckle 
A buckle is a really cool way to start your bracelet. I'm not going to explain them here but I will put some links on some different tutorials. Alicat's tutorial on friendship-bracelets.net   spiffehgymnast's tutorial on friendship-bracelets.net
To end your bracelet that begins with a buckle, you can make two braids or put a button on the end. I won't explain the button ending but I will post a link. Rose47's tutorial on friendship-bracelets.net

V-shaped ending 
I haven't tried this method yet but I have seen pictures and it is really cool! I didn't create this method so I will post a link. faliza's tutorial on friendship-bracelets.net

Braided leaves bracelet

Here is a picture of the braided leaves friendship bracelet. I did not come up with this bracelet; I found it here piggyfan2's tutorial on friendship-bracelets.net.


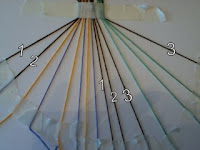
I didn't make it exactly like the tutorial so I am going to explain how I set up my strings to get it to look the way it does :) In the tutorial, the creator used 12 strings with 4 strings in each group. But in my bracelet I used 15 strings with 5 strings in each group. For each color group (pink, teal, purple) there is a white outline around each color. I am going to show you my string setup so you can make this bracelet the way I did!
For my bracelet the string setup was something like this


I only numbered the outline strings because orange=1   blue=2   green=3
So now you just follow the tutorial and you have yourself a bracelet! I hope this post/mini tutorial made sense :) If you have any questions, feel free to comment. 


Wednesday, April 3, 2013

Candy Wrapper Bracelet


I made a candy wrapper bracelet out of dum-dum wrappers. I used a total of 20 wrappers. I did not create this method though. Go on Youtube and search it and you should be able to find a tutorial :)